The camera of the iPhone takes technically good photos and is fully automatic. You just have to press the shutter button to take a correctly exposed photo. I have collected 11 iPhone photography tips for you, which you can easily apply and with which you can get more out of your iPhone camera.
Tip 1. Quickly launch the camera app
Without first unlocking your iPhone, you can launch the iPhone Camera app from the Lock screen by swiping to the left. You don’t have to miss a photo opportunity this way.
Tip 2. Turn on HDR
With High Dynamics Range (HDR), multiple photos with different exposures are merged into one, so that in difficult and contrast-rich lighting conditions, details are visible in the dark and light areas. You can enable HDR in the camera app settings.
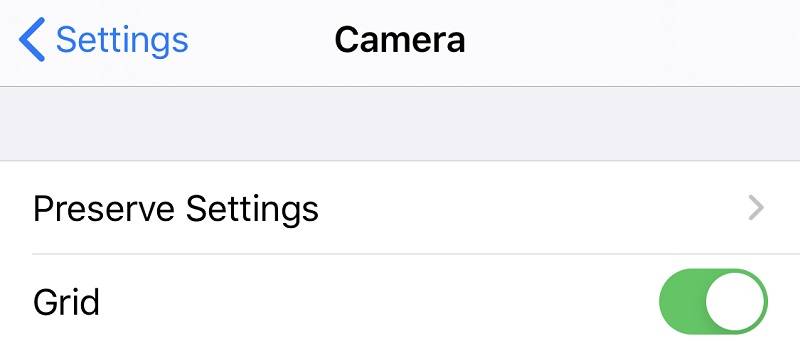
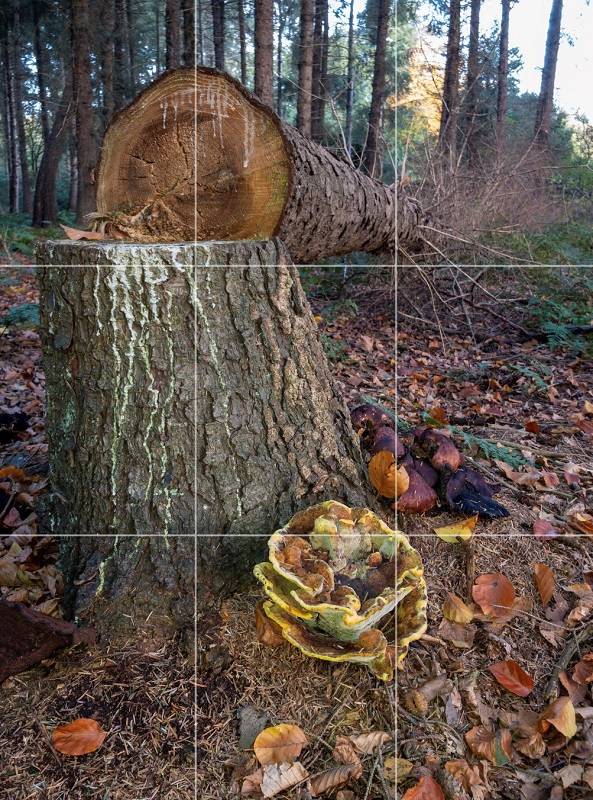
Tip 3: Enable the grid
By enabling the grid you have a good tool for applying the Rule of Thirds and keeping the horizon straight. With the Rule of Thirds you can improve the composition of your photo. According to this rule, the image is divided into 9 equal parts with two vertical and two horizontal lines. By placing your subject on or near one of the four cross points, you make the photo more interesting. You can use a horizontal line of the grid to keep the horizon straight while shooting.
You can activate the grid in the iPhone camera app. Go to the settings and then to the camera app and switch on the grid.
This video explains how to enable the grid and apply the Rule of Thirds.
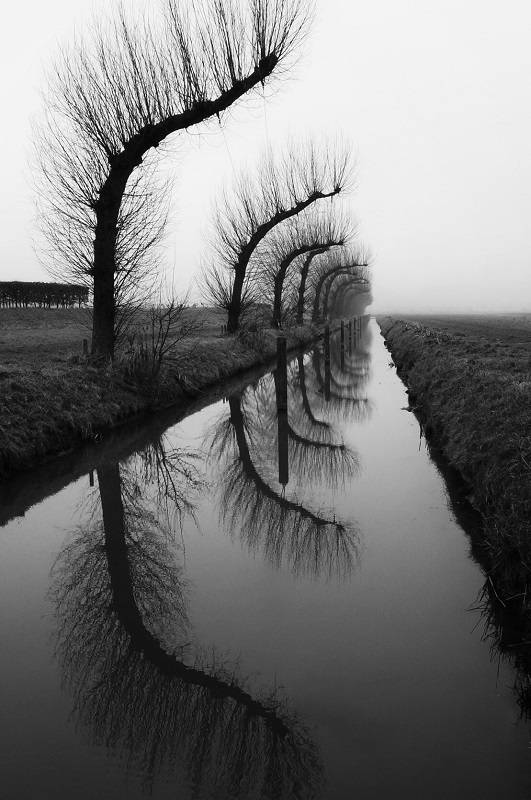
Tip 4: Use Leading Lines
With Leading Lines you guide the viewer’s eye through the photo and they create depth. You can emphasize the subject of your photo by letting the lines point to it. Canals, rivers, roads, stairs, railways, etc. can be Leading Lines. On the photos of my blog about landscape photography you can see many examples of Leading Lines. Also read my blog about Leading Lines.
iPhone photography tip 5: Shoot panoramas
Take a panorama photo if the subject does not fit in the frame or for landscapes and sunsets. The camera takes multiple photos that are then automatically merged into one panorama photo. In this blog about the panorama mode I show examples and tell you how it works.
iPhone photography tip 6: Experiment with a low point of view
A low point of view can be more interesting than a photo taken at eye level. Small objects can become a foreground at a low point of view, so that you get depth in the photo.

iPhone photography tip 7: Zoom
Only use the zoom if you have an iPhone with multiple cameras. You can then optically zoom with the iPhone camera app by switching between the different lenses with the 1x, 2x and 0.5x button (iPhone 11). If you select something else than these three options, the camera will zoom digitally. Optical zoom has the advantage over digital zoom that there is no loss of photo quality. Instead of digital zoom, it is better to crop the photo with an editing program such as Snapseed.
iPhone photography tip 8: RAW
Photograph in RAW if you like to edit your photos. An iPhone RAW photo file contains the unprocessed raw data captured by the sensor. With a special iPhone camera app such as Lightroom CC Mobile (App Store) or ProCamera, you can shoot in RAW.
Tip 9: The focus point
Determine the focus point yourself if you are shooting up close. Focusing is done automatically in the iPhone Camera app. With close-up photography it can sometimes happen that the camera focuses on the background. You can focus on a specific area by tapping the screen; the square that appears is the focus point.
With AE/AF lock, you can hold the focus and then determine the composition, without the camera refocusing. For AE/AF lock, hold your finger on the screen until AE/AF lock appears. You can cancel the AE/AF lock by tapping on the screen.
Tip 10: The Burst mode for action photos
In the photo and square camera modes, you can take pictures with burst mode by tapping and holding the shutter button. In burst mode the camera quickly takes multiple photos. The photos are grouped in the photos app and displayed as stacked photos. To make a selection, tap on the burst photos and then tap select. The Photos app will indicate with a grey dot what the best photo is, based on a number of factors such as sharpness and exposure. You can swipe and tap the photos and select one or more favorites. Tap on done when you have finished your selection. In the next screen you can indicate whether you want to keep everything or only the favorites. Also watch the video below.
Tip 11: A volume button as the shutter button
You can use a volume button as the shutter button. You can then hold the iPhone more firmly while shooting, so the chance of motion blur is smaller. This is especially useful in low light, because then the iPhone camera uses a slow shutter speed.
Other iPhone photography tips
Also read my iPhone photography tips for landscape, autumn and sunset photography, or go to the overview with all iPhone photography blogs.